Whether you’re learning how to install Windows 11 from a USB drive, checking out the latest version of Windows, or discovering how to write an ISO file to a USB drive, this comprehensive guide provides step-by-step instructions and essential information to help you navigate these tasks with ease.
What is the Latest Version of Windows?
Windows 11 is the latest version of the Windows operating system released by Microsoft. It introduces a refreshed user interface, enhanced multitasking features like Snap Layouts and Snap Groups, and improved gaming capabilities through technologies such as DirectStorage.
Installing Windows 11 from USB
Windows 11 brings significant improvements designed to elevate user experience and productivity. Here’s how you can install it from a USB drive:
- Prepare Your System:
- Ensure your PC meets the minimum system requirements for Windows 11, including a compatible processor, sufficient RAM, and storage space.
- Back up your important files to prevent data loss during the installation process.
- Create a Bootable USB Drive:
- Download the Windows 11 ISO file from Microsoft’s official website.
- Insert a USB drive (minimum 8GB) into your computer.
- Use a reliable tool like Rufus or the Windows Media Creation Tool to create a bootable USB drive from the ISO file. Follow the tool’s instructions carefully.
- Install Windows 11:
- Restart your computer with the bootable USB drive inserted.
- Access the BIOS or UEFI settings and set the USB drive as the primary boot device.
- Save the changes and restart your computer again to initiate the installation process.
- Follow the on-screen instructions to complete the installation of Windows 11.
Burning ISO File to USB
Burning an ISO file to a USB drive allows you to create a bootable installation media for various purposes, including installing a new operating system or creating a recovery tool. Here’s how you can do it:
- Download the ISO File:
- Obtain the ISO file for the operating system or software you wish to install or create a bootable drive for.
- Prepare Your USB Drive:
- Insert a USB drive with sufficient storage capacity (minimum 8GB).
- Use Rufus or Windows Media Creation Tool:
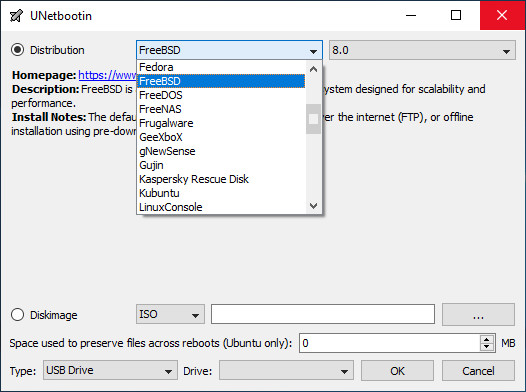
- Choose a reliable tool like Rufus, Windows Media Creation Tool (only for Windows) or Unetbootin to burn the ISO file to the USB drive.
- Open the tool, select the ISO file, and designate the USB drive as the destination.
- Start the Burning Process:
- Initiate the burning process by clicking “Start” or “Create”.
- Depending on the size of the ISO file and the speed of your USB drive, the process may take several minutes.
- Verify and Eject:
- Once the burning process is complete, verify that the USB drive is bootable by checking its contents or booting it on another system.
- Safely eject the USB drive from your computer.

By following these comprehensive steps, you can efficiently install Windows 11 from a USB drive, stay updated with the latest version of Windows, and confidently create bootable USB drives for various purposes.
For more detailed instructions or troubleshooting tips, refer to Microsoft’s official support resources or community forums. Stay tuned for future updates and enhancements in the world of Windows operating systems!
Stay Updated with ToolsLib! 🚀
Join our community to receive the latest cybersecurity tips, software updates, and exclusive insights straight to your inbox!


